Disable Designer in Visual Studio

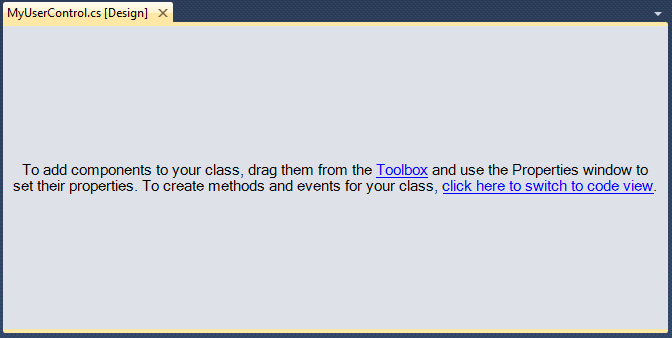
When double-clicking on custom user control code, Visual Studio may open a window with the message, “To add components to your class, drag them from the Toolbox and use the Properties window to set their properties. To create methods and events for your class, click here to switch to code view.”

To go to code view, you either have to:

  • Press F7
  • Or click on the “Click here to switch to code view.”

Instead, you can change the default behaviour of opening a user control to go straight to code view by applying the DesignerCategory Attribute to your custom user control class, e.g.

[System.ComponentModel.DesignerCategory("")]
public class MyUserControl : ...
{
   ...
}

Mutable & Immutable Classes

This post describes a method for creating a mutable and immutable version of the same class. At a first glance, there may seem to be two obvious ways to approach this problem; either:

  1. Create a base Mutable Class and derive a Immutable version of this class; or
  2. Create a base Immutable Class and derive a Mutable version of this class.
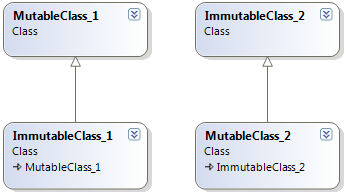
To help decide which may be the best design, we can refer back to the principles of object-oriented design. The Liskov Substitution Principle states that subtypes must be substitutable for their base types.

Don’t inherit unless you really are (and can be treated in all respects) like what you derive from.

Keeping this in mind, we can see that solution one would violate this principle. You can not treat an Immutable object as a Mutable object. i.e. you would not want a user to be able to cast an immutable object, to it’s parents-type, so that the user could then mutate that object.

A simple implementation of solution two is shown below.

    public class ImmutableClass
    {
        public int SomeProperty { get; protected set; }
        public string AnotherProperty { get; protected set; }
    }

    public class MutableClass : ImmutableClass
    {
        public new int SomeProperty
        {
            get
            {
                return base.SomeProperty;
            }
            set
            {
                base.SomeProperty = value;
            }
        }

        public new string AnotherProperty
        {
            get
            {
                return base.AnotherProperty;
            }
            set
            {
                base.AnotherProperty = value;
            }
        }
    }
Customize the Assigned To Field

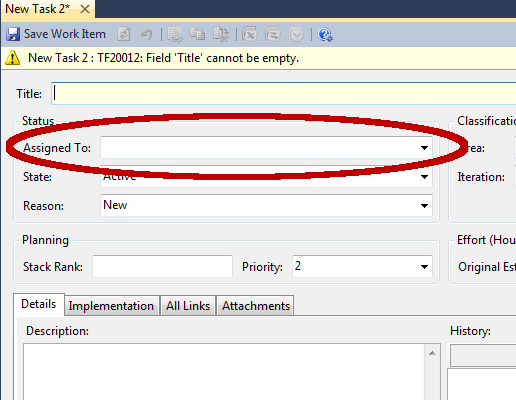
You can customize the Assigned To field on a Visual Studio’s work item type to limit the values for the field to individuals who work on your team.

To do this, export the XML file and modify its content to customize the Assigned To field. Then import the XML file to start to use the updated work item type.

Required Permissions

To perform this procedure you must be a member of the Team Foundation Administrators group or a member of the Project Administrators group for the project.

Customizing the Assigned To Field

  1. To modify a work item type on a single project, run witadmin exportwitd  to export the XML file for the work item type you want to modify.
    witadmin exportwitd /collection:[TFS] /p:[ProjectName] /n:[WorkItemType] /f:[FileOut]
    where:
        [TFS] = Team Foundation Server URL
        [ProjectName] = Name of TFS Project
        [WorkItemType] = The work item type we want to export
        [FileOut] = The name of the file to output to.
    
    note:
        witadmin can be found in:
        \Program Files (x86)\Microsoft Visual Studio 10.0\Common7\IDE
    
    e.g.
    witadmin exportwitd /collection:http://mytfs:8080/tfs/mytfs /p:ExampleProject /n:Task /f:C:\Users\TheSoftwareShrink\Desktop\Task.xml
  2. Open the exported file (*.xml) in an editor (e.g. Notepad)
  3. Find the section within the XML file that describes the Assigned To field (see example below). Notice the VALIDUSER rule that allows for any registered user on the Team Foundation Server as a field value.
    <FIELDS>
        <FIELD name="Assigned To" refname="System.AssignedTo" type="String" reportable="dimension">
            <VALIDUSER />
        </FIELD>
    ...
    </FIELDS>
  4. Change the XML as shown below in the following example. This limits the values of the Assigned To field to the members of the team project’s Contributorsgroup.
    <FIELDS>
        <FIELD name="Assigned To" refname="System.AssignedTo" type="String" syncnamechanges="true" reportable="dimension">
            <HELPTEXT>The person currently working on this task</HELPTEXT>
            <ALLOWEXISTINGVALUE />
            <ALLOWEDVALUES expanditems="true" filteritems="excludegroups">
                <LISTITEM value="[Project]\Contributors" />
            </ALLOWEDVALUES>
        </FIELD>
    ...
    </FIELDS
  5. Save the changes.
  6. To import the new work item type to a single project, run witadmin importwitd
    witadmin importwitd /collection:http://mytfs:8080/tfs/mytfs /p:ExampleProject /f:C:\Users\TheSoftwareShrinkDesktop\Task.xml

Verifying changes imported to a single project

  1. In Team Explorer, click Refresh to download the latest updates from the server.
    These updates include the changes that you just imported. Wait several seconds until the Work Items node is loaded. Nodes that are still loading are labeled working.
  2. Create a new work item using the work item type you modified. To do this, right-click the Work Items node, point to Add Work Item, and then click the Task work item type.
  3. Select the Assigned To box. Notice that the list of allowed values has changed to include the group of users and values that you specified.
  4. Click Close to close the new work item. Click No when you are prompted to save the work item.

How to double-click to diff pending changes

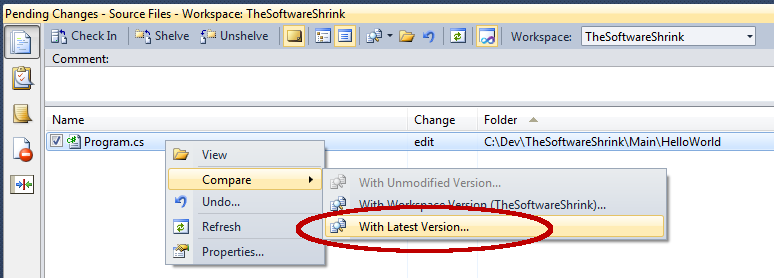
When reviewing the pending changes window within Microsoft Visual Studio 2010 the default action of double-clicking an item views the file. To diff the pending changes between the file and the latest version, you have to:

  1. Right Click the file
  2. Left Click “Compare”
  3. Left Click “With Latest Version…”

OUCH! There’s got to be an easier way! Well there is …

You can avoid the mouse dance, by performing a “Compare with Latest Version” by either:

  • Holding Shift + Double-Clicking the file
  • Highlighting the file and pressing Shift+Enter

You can also change the default behaviour of double-clicking a file to be Compare rather than View. To do this, just update the registry setting:

HKCU\Software\Microsoft\VisualStudio\<ver>\TeamFoundation\SourceControl\Behavior\DoubleClickOnChange
    0 : View file
    1 : Compare with Latest Version

Change Visual Studio 2012 default check-in action

In Visual Studio, the default check-in action is resolve, e.g.

This may be an issue as once a task has been implemented, a developer may wish to pass this task to another developer for code review prior to resolving the issue. Instead, when the code is checked-in, we want to associate the code with the task rather than resolve the task.

You can modify this behaviour by changing a registry setting. Change the following key’s value to False.

HKEY_CURRENT_USER\Software\Microsoft\VisualStudio\11.0\TeamFoundation\SourceControl\Behaviour\ResolveAsDefaultCheckinAction